How to Check Real-Time Server Latency in the PUBG HUD
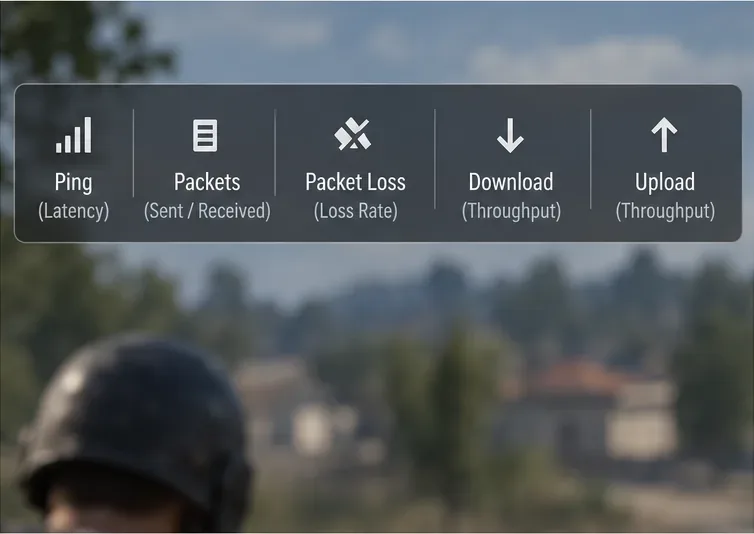
Enable PUBG’s network statistics HUD to monitor ping and packet loss in a match. See where to find it, what the numbers mean, and what they cannot diagnose.
Valorant error VAN 9005 is a Riot Vanguard security-configuration error, not a generic “game files are corrupted” message. Riot’s current support page, updated January 15, 2026, says VAN 9005 appears when Vanguard does not detect the security setup it needs to use virtualization-based security (VBS): TPM 2.0, UEFI-compatible firmware with Secure Boot, and a working Memory Integrity/VBS configuration. The most useful approach is therefore to verify those requirements in order rather than immediately reinstalling VALORANT or changing unrelated Windows settings.
This distinction matters because advice for other Vanguard errors is often mixed into VAN 9005 troubleshooting. A fix can be reasonable for a different VAN code without being the right first action here. The steps below separate what Riot and Microsoft currently document from what depends on your hardware and from what is not established for VAN 9005 specifically.
Verified: Riot states that VAN 9005 means Vanguard currently requires TPM 2.0 and UEFI-compliant firmware to use VBS, but the required security configuration is not being detected. Riot’s prescribed sequence is: enable TPM 2.0, enable Secure Boot, check Memory Integrity, restart, and try the game again. See Riot’s VAN 9005 support page.
Action: Do not start by reinstalling the game. First establish which security requirement is actually missing.
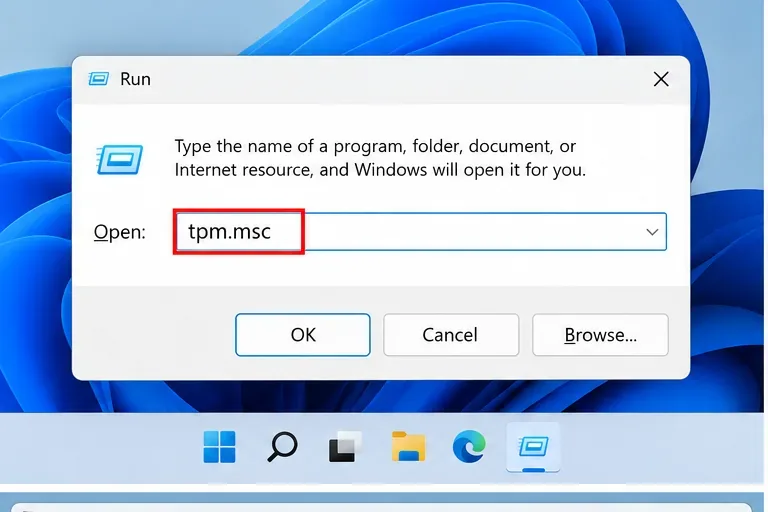
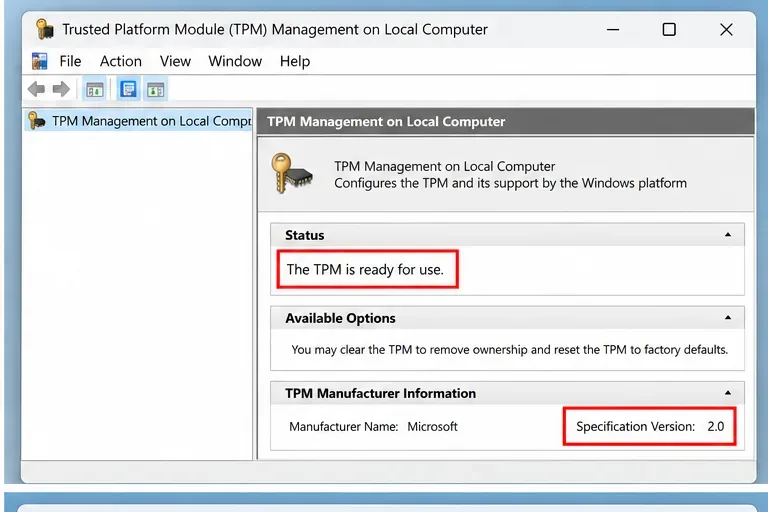
Press Windows + R, type tpm.msc, and press Enter. This is the quickest supported way to see whether Windows detects a Trusted Platform Module. Microsoft likewise recommends tpm.msc or Windows Security for checking TPM status. Riot’s TPM guide says the healthy result is The TPM is ready for use with Specification Version: 2.0.
If TPM 2.0 is already ready, do not change TPM settings just because VAN 9005 appears. Move to Secure Boot. If Windows says a compatible TPM cannot be found, the TPM may be disabled in firmware. On Intel systems the firmware TPM can be labeled PTT or Intel Platform Trust Technology; on AMD systems it is commonly labeled fTPM or AMD CPU fTPM. The exact wording varies by motherboard.
Hardware-dependent: BIOS and UEFI menus differ substantially among ASUS, MSI, Gigabyte, ASRock, Dell, Lenovo, HP, and other manufacturers. Riot explicitly recommends following the manufacturer’s instructions if you are not comfortable changing firmware settings. Microsoft also notes that TPM controls vary by device. See Microsoft’s TPM 2.0 guidance and Riot’s TPM 2.0 guide.
Action: If TPM is missing, use your PC or motherboard vendor’s documentation to enable PTT or fTPM, then return to Windows and run tpm.msc again. Do not clear the TPM as a troubleshooting shortcut; clearing TPM keys can affect features such as BitLocker.
Press Windows + R, type msinfo32, and press Enter. In System Information, check two fields: BIOS Mode should read UEFI, and Secure Boot State should read On. Riot uses these exact checks in its Secure Boot guide.
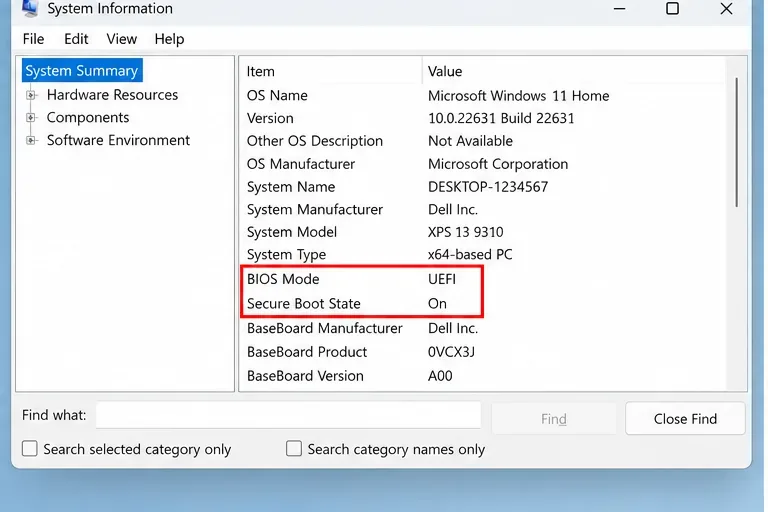
If BIOS Mode is UEFI but Secure Boot State is Off, you generally need to enable Secure Boot in firmware. If BIOS Mode says Legacy, the situation is different: Secure Boot requires UEFI. Riot warns that switching firmware from Legacy/CSM to UEFI before the Windows system disk is prepared correctly can prevent Windows from booting. Its current guide tells Legacy users to check whether the Windows disk uses GPT and, where appropriate, convert from MBR to GPT before changing boot mode.
Action: If you see Legacy, stop before flipping a firmware switch. Follow Riot’s Secure Boot guide and Microsoft/OEM documentation for your exact system. Back up important files first, and make sure you understand any BitLocker implications.
When you need to change TPM, Secure Boot, or CPU virtualization, Windows 11 provides a predictable route: open Settings > System > Recovery, then select Restart now under Advanced startup.
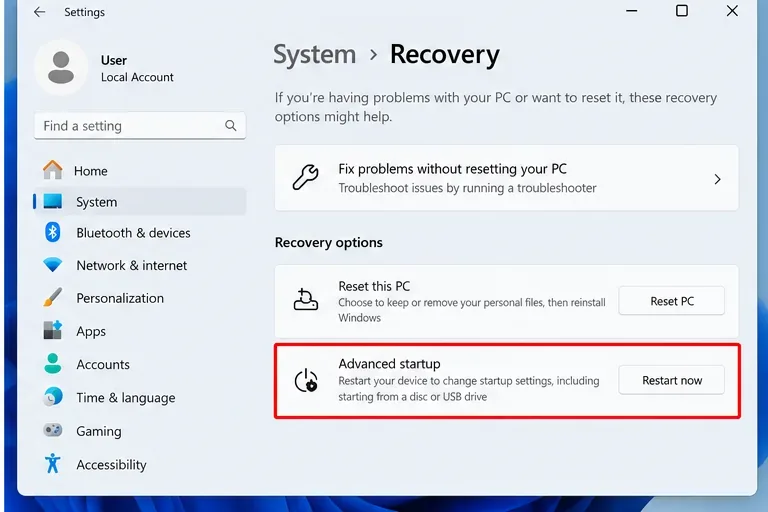
After the PC restarts, choose Troubleshoot > Advanced options > UEFI Firmware Settings. This avoids repeatedly trying Del, F2, F10, or another manufacturer-specific hotkey, although those keys can also work on many PCs.
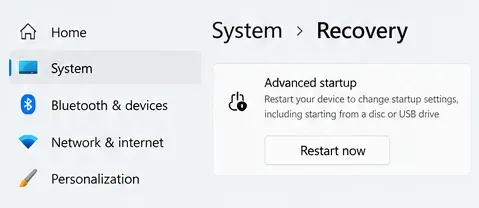
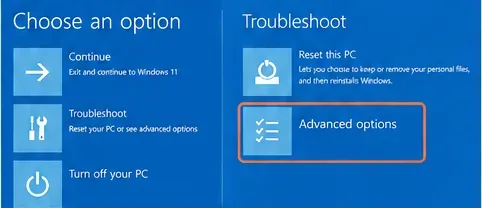
Action: Use the Windows recovery route when it is available. If UEFI Firmware Settings does not appear, consult the PC or motherboard manufacturer rather than assuming the firmware lacks the feature.
Inside UEFI, look for Secure Boot under a Boot, Security, Authentication, or similarly named section. The exact path cannot be universalized because vendors organize firmware differently. Riot’s current guidance says the system should use UEFI rather than Legacy/CSM, the system disk should use GPT, and Secure Boot should be enabled.

Verified: Microsoft describes Secure Boot as a firmware-backed security feature that helps prevent untrusted software from loading during startup. Microsoft is also updating Secure Boot certificates across supported Windows releases in 2026, but that certificate servicing work is separate from the basic VAN 9005 check: for this error, first confirm that Secure Boot State itself reports On in Windows.
Action: Save firmware changes, boot back into Windows, reopen msinfo32, and verify both UEFI and Secure Boot State: On before moving on.
Riot’s VAN 9005 page now explicitly includes Memory Integrity in the required troubleshooting sequence. Riot’s Memory Integrity guide, updated June 24, 2026, says to open msinfo32, scroll to the bottom of System Summary, and look for Virtualization-based security. If it says Running, VBS is active. If it is enabled but not running, hardware virtualization may not be enabled in firmware.
To enable Memory Integrity in Windows, Riot directs users to Windows Security’s Device Security/Core isolation area. On current Windows 11 builds, a common path is Settings > Privacy & security > Windows Security > Device security > Core isolation details, then turn on Memory integrity and restart. Microsoft describes Memory Integrity as an HVCI/VBS feature that isolates code-integrity checks with the Windows hypervisor.
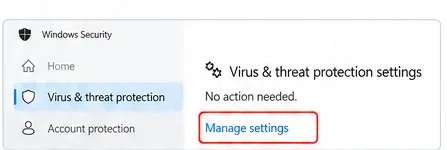
Common misconception: Virus & threat protection exclusions are not the same setting as Memory Integrity. Riot’s current VAN 9005 instructions do not tell players to disable antivirus protection, add VALORANT exclusions, or turn off Windows Security. Those actions are sometimes suggested for unrelated launch problems, but they are not established first-line fixes for VAN 9005.
Action: Go to Device Security/Core isolation, not Virus & threat protection. If Memory Integrity is unavailable or reports incompatible drivers, update or remove the specific incompatible driver identified by Windows rather than disabling security broadly.
Riot says VBS requires hardware virtualization. On Intel systems the setting is typically Intel Virtualization Technology (VT-x); on AMD systems it is commonly SVM Mode. Riot also notes that firmware names and locations vary, and some systems may require a BIOS update before the option appears or functions correctly.
A quick Windows-side check is Task Manager: open Task Manager > Performance > CPU and look for Virtualization: Enabled. Riot lists this as a secondary confirmation. If it says Disabled and VBS will not run, enter UEFI and follow your manufacturer’s instructions to enable VT-x or SVM.
Action: After changing virtualization settings, restart Windows and recheck msinfo32. Riot’s success condition is VBS showing Running; its guide also says the VBS services running list should include Hypervisor-enforced Code Integrity.
Once TPM 2.0 is ready, BIOS Mode is UEFI, Secure Boot State is On, and VBS/Memory Integrity is running as expected, restart the PC and launch VALORANT again. Testing after each verified correction helps identify which setting was actually responsible rather than changing several variables at once.
What is not known from the error code alone: VAN 9005 does not identify the precise firmware menu, driver, or motherboard limitation causing the failed security check. It also does not prove that VALORANT files are damaged. The code tells you that Vanguard is not seeing the security configuration it expects; the checks above narrow down which part is missing.
Action: Keep a short note of the four states you verified: TPM 2.0 ready, UEFI, Secure Boot On, and VBS Running. That information is useful if you need support.
Reinstalling Vanguard is a common piece of general anti-cheat advice, but Riot’s current VAN 9005 article does not list reinstalling Vanguard as part of the primary resolution. That does not prove reinstalling can never help with a separate installation problem; it means it should not replace the documented TPM, Secure Boot, and Memory Integrity checks for this specific code.
Action: Complete the verified security checks first. If they all pass and VAN 9005 remains, follow Riot’s escalation path rather than repeatedly reinstalling software.
Riot says that if TPM 2.0, Secure Boot, and Memory Integrity are correctly configured but VAN 9005 still appears, submit a Player Support ticket and attach logs. Riot provides a Riot Repair Tool log guide for collecting the diagnostic files support may need.
This is also the point to involve your PC or motherboard manufacturer if Windows does not detect TPM 2.0, Secure Boot cannot be enabled, UEFI options are missing, or a firmware update is required. Firmware changes can affect bootability and disk encryption, so guessing is a poor tradeoff once the documented checks stop matching what your system shows.
| Check | Expected result | If it does not match |
|---|---|---|
| TPM | tpm.msc: ready for use; Specification Version 2.0 | Enable Intel PTT or AMD fTPM using OEM instructions |
| Firmware mode | msinfo32: BIOS Mode = UEFI | Do not switch blindly from Legacy; verify GPT/boot setup first |
| Secure Boot | msinfo32: Secure Boot State = On | Enable in UEFI after confirming the system is UEFI/GPT-ready |
| VBS / Memory Integrity | msinfo32: Virtualization-based security = Running | Enable Memory Integrity; check VT-x/SVM and incompatible drivers |
| After changes | VALORANT starts without VAN 9005 | Restart once more, then send Riot a ticket with logs |
The key is to treat VAN 9005 as a security-state validation problem. Confirm the states Riot asks for, change only the one that is wrong, and verify the result in Windows before proceeding. That produces a much clearer diagnosis than cycling through unrelated launch fixes.
Enable PUBG’s network statistics HUD to monitor ping and packet loss in a match. See where to find it, what the numbers mean, and what they cannot diagnose.
Learn how to import VALORANT crosshair codes, compare presets with manual settings and spectator copy, and fix common import issues.
Choose Dota 2 minimap size, hero icons, team colors, and background settings by readability, fewer misclicks, and clear results on your own display.
Fix Fortnite texture pop-in on PC with official steps for GPU drivers, file verification, DirectX 12, high-resolution textures, VRAM, SSDs, and stutter.
Learn what Heroes of the Storm minimap size and position options are verified, improve readability, and choose camera-click controls that suit you.
Set Super Smash Bros. Ultimate Quickplay to prefer hazards-off stages. Follow the Preferred Rules menu steps and learn why matchmaking may not always honor them.
Enable Server Latency and Packet Loss in Warzone to monitor connection quality, read the overlay, and use recurring spikes to guide troubleshooting.
Learn how to carry from mid lane in League of Legends by setting up waves, choosing safe roam windows, reading side lanes, and converting pressure into objectives.
Fix Minecraft Evoker spell problems with a safe vanilla test, version checks, log review, and a step-by-step way to isolate mod or datapack conflicts.
Fix PUBG stuck on Initializing on Steam with a focused checklist for PC service notices, launch options, game files, downloads, and connection issues.