Fortnite Save the World is the cooperative PvE mode where you team up with up to three other players, build massive forts, scavenge resources, and defend against waves of zombie-like Husks. If you have ever wondered how to play Save the World in Fortnite, this step-by-step guide covers everything you need: from accessing the mode for the first time to surviving Storm Shield Defenses and leveling up your heroes.

What you need before you start
Save the World is a paid mode available through the in-game store or as part of certain bundles. Once purchased, it is tied to your Epic Games account and accessible on PC, PlayStation, and Xbox. You do not need a Nintendo Switch or mobile device, as Save the World is not available on those platforms. A basic understanding of Fortnite's building and shooting mechanics will help, but the mode has its own tutorial that walks you through everything from scratch.
How to play Save the World in Fortnite
-
Step 1: Access Save the World Mode
Launch Fortnite and look for the mode selector on the main screen. You will see tiles for Battle Royale, Save the World, Creative, and other modes. Click or select Save the World. If you have not purchased it yet, the game will direct you to the store. Once you own it, selecting the tile takes you straight into the lobby where you can browse missions, manage your heroes, and invite friends.
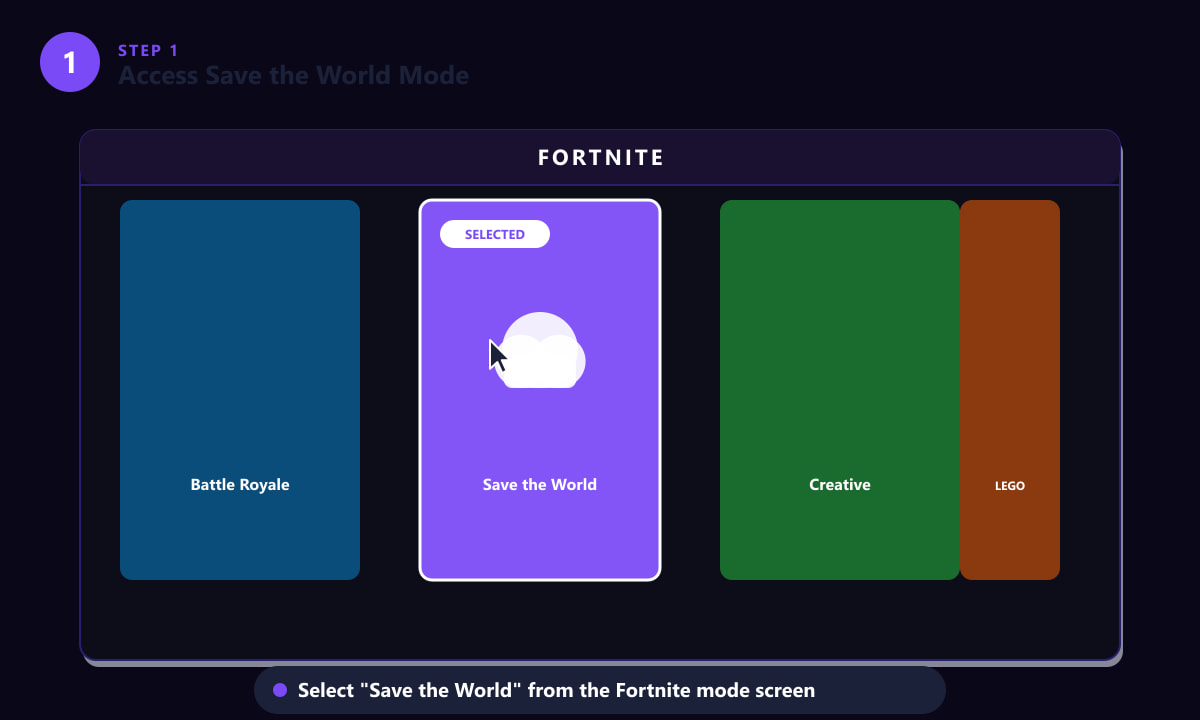
Select the Save the World tile from the Fortnite mode screen. The tile shows a storm icon to distinguish it from other modes. -
Step 2: Complete the Tutorial and Early Quests
The first time you enter Save the World, the game launches a guided tutorial mission set in Stonewood, the first biome. This teaches you the core loop: explore a map, collect resources, build defenses, and repel Husk waves. After the tutorial, the Quest panel displays a list of story missions. Complete them in order — they unlock new zones, gear slots, and game mechanics at a steady pace, making the mode far less overwhelming than diving into the collection book or research trees right away.
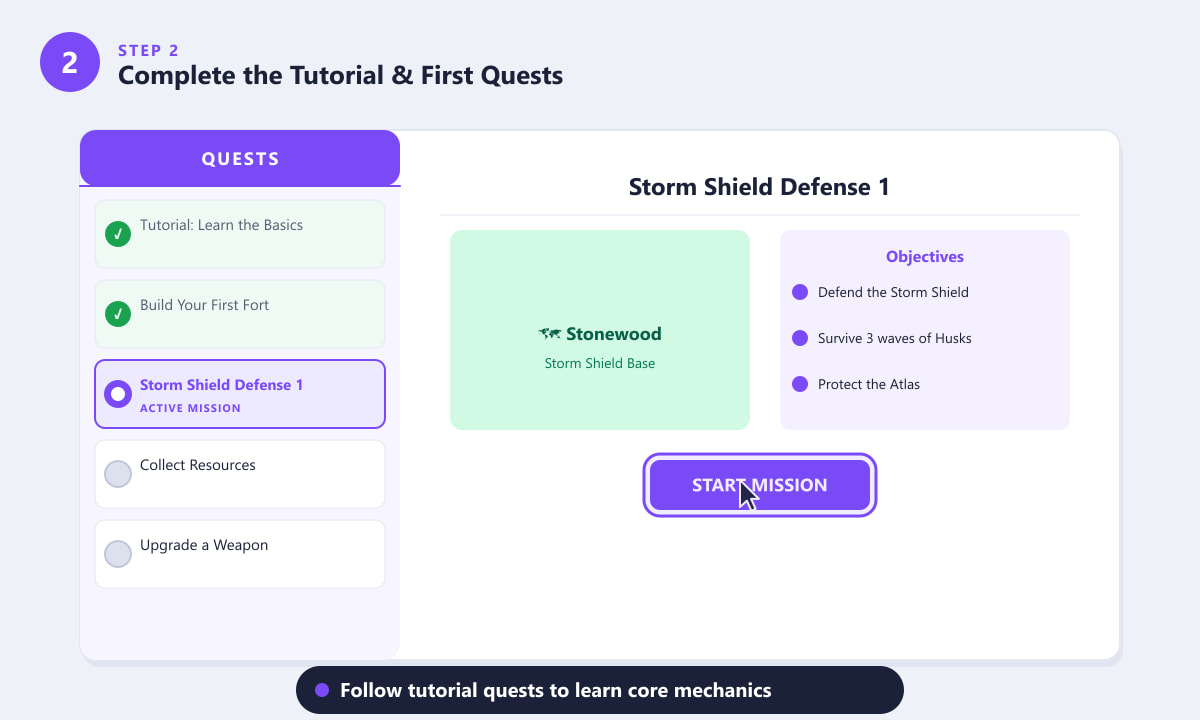
The Quest panel tracks your progress. Completed quests show a green check; your active mission shows an orange highlight. Tap Start Mission when you are ready. -
Step 3: Explore the Map and Gather Resources
Before each mission begins, you have a pre-defense phase to explore the zone. Use your Harvesting Tool (pickaxe) to smash wooden structures, stone boulders, and metal containers. Each material has a different strength: wood is fastest to collect and build but weakest under attack, stone is more durable, and metal is the slowest to build but toughest. Search chests, ammo boxes, and survivor camps for weapons, traps, and extra loot. Aim to leave with at least 1,000 wood before placing your first structure.
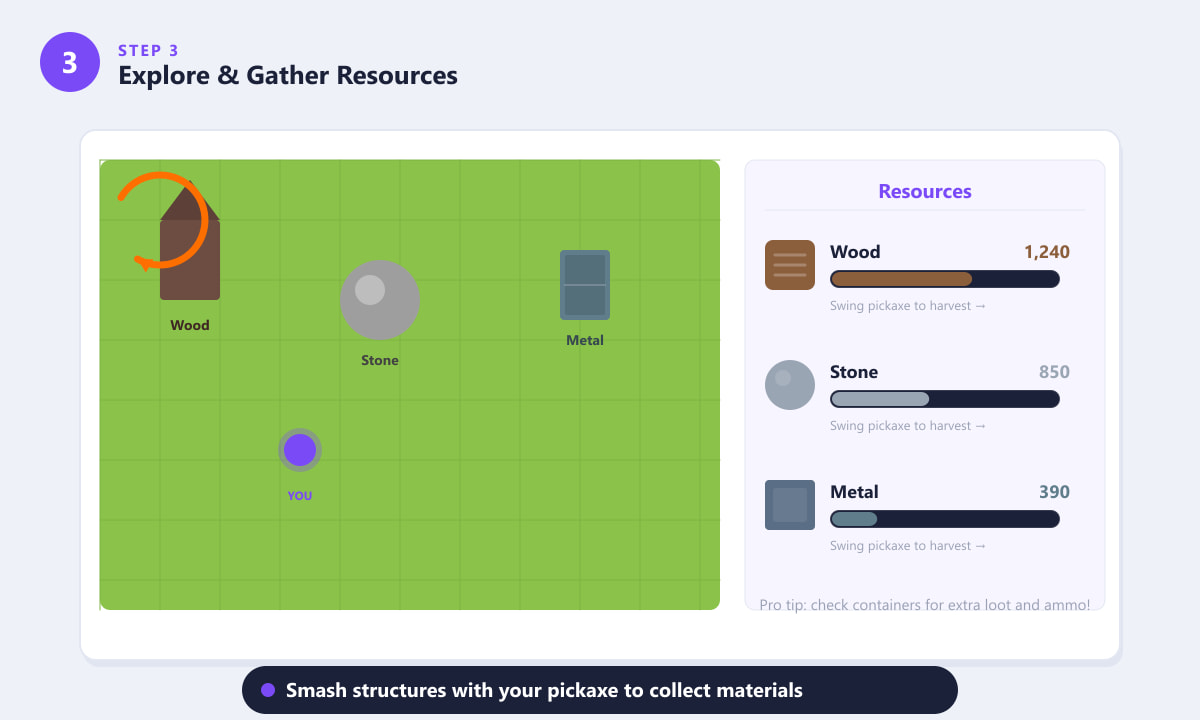
Swing your Harvesting Tool at buildings, rocks, and cars to collect wood, stone, and metal. Higher rarity resources are found deeper into the map. -
Step 4: Build and Fortify Your Fort
With materials in hand, build a kill funnel around the mission objective — usually the Atlas, a large crystal device that must not be destroyed. Use walls and ramps to channel Husks into narrow corridors, and place floor traps (such as Ceiling Zappers, Floor Launchers, and Gas Traps) inside those corridors for passive damage. A strong fort does not need to be enormous — a compact, multi-layered structure with well-placed traps beats a sprawling base you cannot repair in time. Remember: you can build in edit mode to add doors, windows, and angled walls that funnel enemies toward your traps.
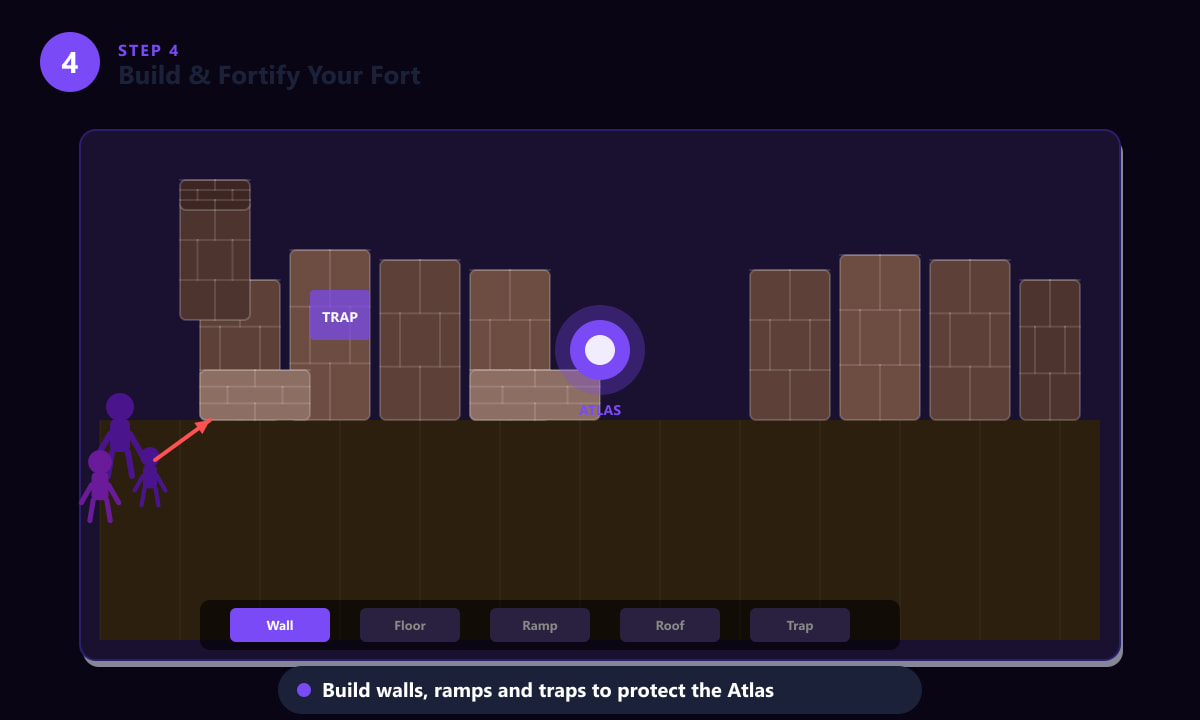
Build walls around the Atlas, place traps in chokepoints, and use the build HUD to switch between wall, floor, ramp, roof, and trap pieces. -
Step 5: Survive the Storm Shield Defense
Once the timer counts down, the Storm begins and Husks pour in from multiple directions shown on your mini-map. Storm Shield Defense missions come in waves — usually two or three — with each wave bringing tougher enemy types such as Smashers (tank enemies who break walls), Pitchers (who lob projectiles from range), and eventually Boss Husks. Prioritize enemies targeting your Atlas first. Repair cracked walls mid-fight using your Harvesting Tool, and keep an eye on your ammo so you do not run dry. When all waves are cleared, the mission ends and you receive rewards.
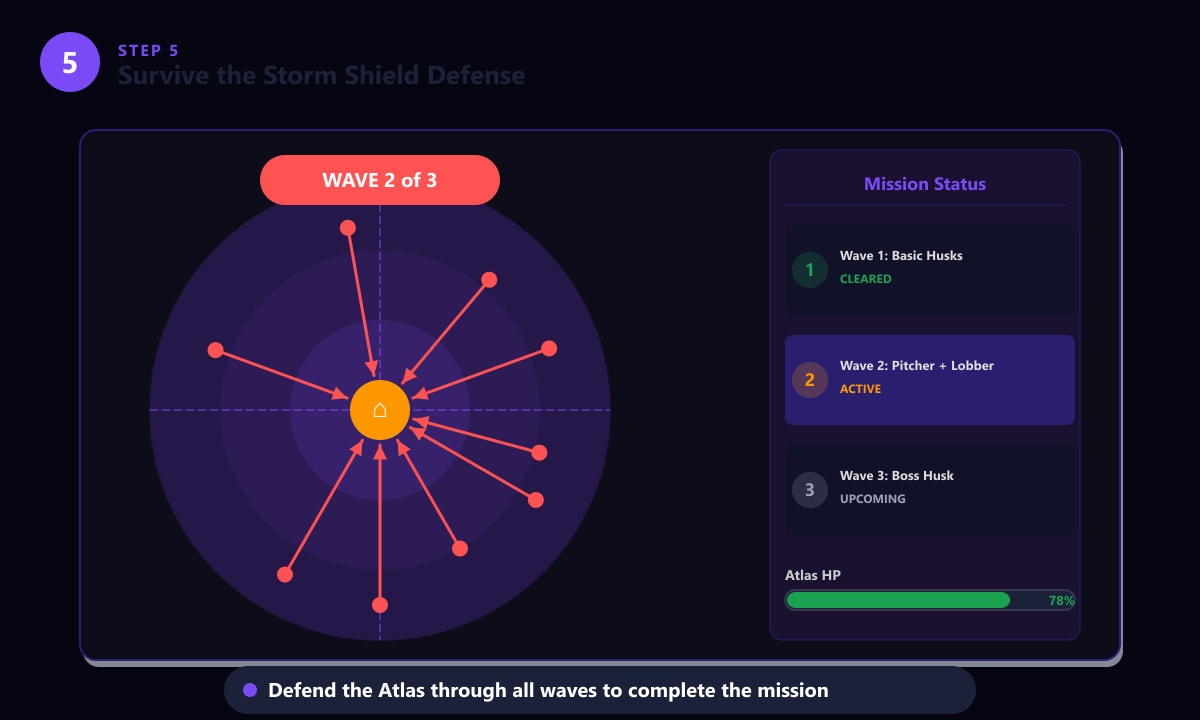
The radar shows enemy positions and directions. Track the wave counter and keep the Atlas health bar green throughout the defense. -
Step 6: Level Up Your Heroes, Weapons, and Research
After missions, spend the earned Experience Points and crafting materials to upgrade your roster. The three main upgrade tracks are: Heroes (each has a unique class — Soldier, Constructor, Ninja, Outlander — and active/passive abilities that improve with level), Weapons (craft new gear from schematics found in loot, then evolve and perk up each weapon to raise its damage and add special effects), and Research (a passive point system that permanently boosts stats like health, shield, damage, and trap effectiveness). Consistently completing daily quests and repeatable missions keeps your XP flowing so all three tracks advance together.
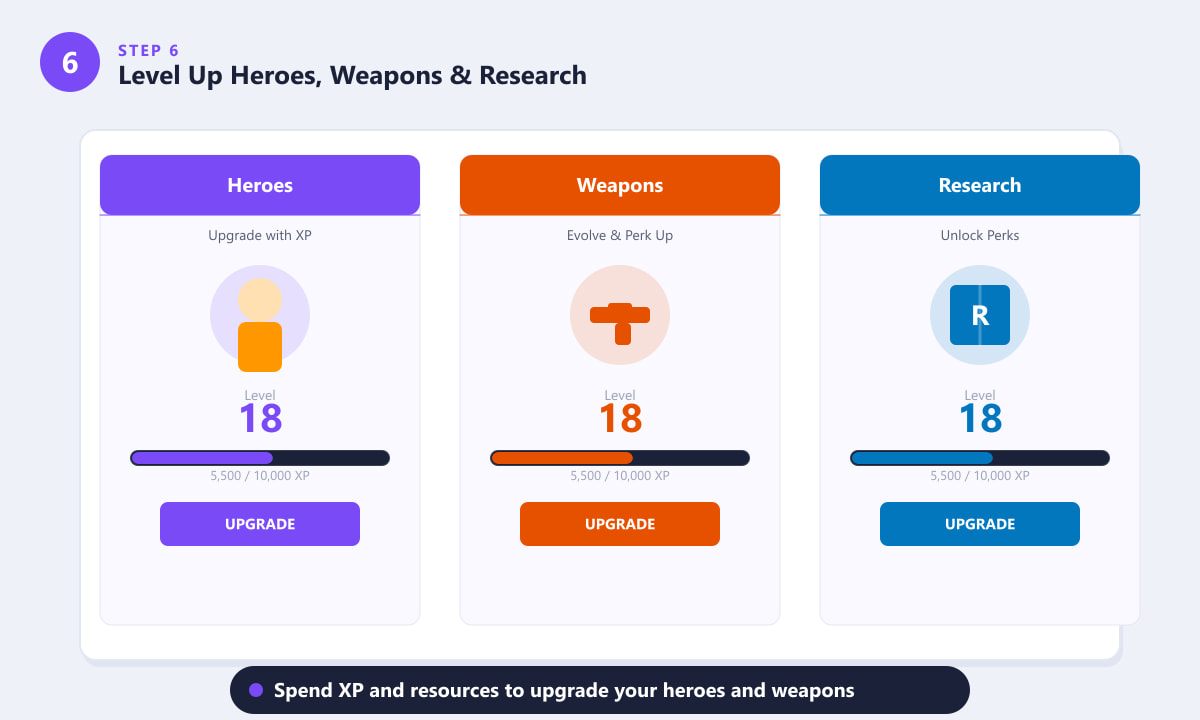
Spend XP in the Heroes, Weapons, and Research panels after each session to steadily increase your power level and unlock new abilities.
Tips for beginners
- Choose the Constructor hero for your first few missions. Constructors have abilities that reduce the building material cost of walls and provide a strong BASE ability that automatically repairs nearby structures during the defense phase.
- Play with others. Matchmaking fills your squad with up to three random players, which shares the building and defending workload. Communication helps, but even a silent squad is often enough for early missions.
- Recycle unwanted weapons. Any schematic or hero you do not need can be recycled for Flux and other materials used to evolve your best gear.
- Advance through the story zones in order: Stonewood, Plankerton, Canny Valley, and Twine Peaks each raise the power level requirement significantly. Trying to skip zones leaves you underleveled and struggling.
- Check the Daily Quests. These reset every day and award generous XP bonuses for tasks you might complete naturally during normal play.
Frequently asked questions
Is Save the World free in Fortnite?
Save the World is a paid mode and must be purchased separately from the free-to-play Battle Royale and Creative modes. Check the Fortnite in-game store or the official Save the World page for current pricing and any available bundles.
Can you play Save the World solo?
Yes. You can complete every mission solo. Many players prefer solo play so they have full control over the fort design. The game adjusts enemy density to a single player, though higher-zone missions become more challenging without teammates.
What is the Atlas in Save the World?
The Atlas is the main mission objective in Storm Shield Defense missions — a large crystal device that the Husks will attack. If the Atlas is destroyed the mission fails, so always build your strongest defenses around it and repair it during combat if its health drops.
How do I get better weapons in Save the World?
Weapons come as schematics found inside loot llamas, event stores, and mission rewards. Craft a schematic with the required materials, then use Evolution and Perk Up in the Armory to increase its rarity, damage, and unique perks.
What does the Outlander class do?
The Outlander hero class specializes in looting and resource gathering, with abilities like TEDDY (a deployable turret), a fast-dash movement skill, and passive bonuses to chest search speed and loot quantity. Outlanders are best used during the pre-defense exploration phase to collect as many materials as possible before the storm arrives.
Final thoughts
Save the World is one of the most rewarding parts of Fortnite for players who enjoy cooperative strategy and progression. Follow the six steps above — access the mode, run the tutorial quests, gather resources, build a solid fort, defend through each wave, and invest your rewards into heroes and weapons — and you will move through the early zones at a steady, satisfying pace. Once you reach Plankerton and beyond, the missions get deeper, the enemy types more varied, and the gear far more exciting to collect and upgrade.
")

")
")
")


")
")
")